Continuing Setup Puppet 8 on Ubuntu 24.04 – Configuration Management for a scaling enterprise. Imagine you’re setting up a web server that runs not just Nginx, but also other technologies. In that case, you’d typically define multiple Puppet classes across different .pp files inside the /etc/puppetlabs/code/environments/production/manifests/ directory. Then, you’d include those classes for your web server node in the site.pp file. If this setup works well for your current needs, that’s perfectly fine.
However, take a step back and consider the bigger picture. Real-world systems rarely consist of just a web server. You’re likely to have a mix of servers – database servers, cache servers, cron servers, development and test environments, and more. Each of these servers will require its own configuration.
If you’re managing all your classes directly within that single manifests directory and relying only on site.pp, things can quickly get messy – especially as your infrastructure grows beyond 20 nodes. Without better organisation, your Puppet codebase can become difficult to maintain and scale.
The concept of Infrastructure as Code is evolving. Puppet introduces a method called “The roles and profiles” which fits the ideal of IaC. In this blog, I want to talk about it and share the way we basically utilise this method and organise our Puppet codebase in order to make it a more reusable, configurable, and refactorable system configuration.
The old puppet way
Before we start, let’s talk about the old way of defining puppet code. With that being said in introduction, if we want to define a web server, we define the configuration (see full example here) for the web-01 server in /etc/puppetlabs/code/environments/production/manifests/site.pp like below :
node 'web-01.srv.local' {
  include nginx
}
If we want this web server to install and configure PHP, MySQL, DNS, or Firewall as well, it becomes:
node 'web-01.srv.local' {
  # Install Nginx
  include nginx

  # Install PHP
  include php

  # Install MySQL Server
  class { 'mysql::server':
    root_password           => 'strongpassword',
    remove_default_accounts => true,
    restart                 => true,
    override_options        => $override_options,
  }
  # Install MySQL Client
  class { 'mysql::client':
    package_name => 'Percona-Server-client-80',
  }
  # Create a 'mydb' database
  mysql::db { 'mydb':
    user     => 'myuser',
    password => 'mypass',
    host     => 'localhost',
    grant    => ['SELECT', 'UPDATE'],
  }
  # Install DNSMASQ
  include dnsmasq

  # Configure firewall
  firewall { '100 allow http and https access':
    dport  => [80, 443],
    proto  => 'tcp',
    jump   => 'accept',
  }
}
Now, if we have another web server called a web-02 server, which has the same configuration as the web-01 server. We will need to copy all of the content defined in the node 'web-01.srv.local' { ... } class to web-02. E.g.
# Configuration for web-01
node 'web-01.srv.local' {
  include nginx

   ...

   # Configure firewall
  firewall { '100 allow http and https access':
    dport  => [80, 443],
    proto  => 'tcp',
    jump   => 'accept',
  }
}

# Configuration for web-02
node 'web-02.srv.local' {
  include nginx

   ...

   # Configure firewall
  firewall { '100 allow http and https access':
    dport  => [80, 443],
    proto  => 'tcp',
    jump   => 'accept',
  }
}
Next, imagine you have more than 2 web servers—maybe even 10—to handle the traffic. If each server requires the same configuration, you’d have to duplicate the same code across all of them. Not very efficient, right? And what if you also want to set up a separate database server with the same MySQL configuration as your web servers? You’d have to copy that configuration code again for a different node. For example:
node 'db-prod-01.srv.local' {
  # Install MySQL Server
  class { 'mysql::server':
    root_password           => 'strongpassword',
    remove_default_accounts => true,
    restart                 => true,
    override_options        => $override_options,
  }
  ...
}
And again, you likely have more than 10 database servers? Have you seen the duplicate here? That’s where the roles and profiles method comes into play.
What is the Roles and Profiles method?
Puppet has a clear definition here. This is how we organise our written Puppet code to reuse it for others, or make it configurable with minimal changes when utilising Hiera – we will discuss later when implementing “roles and profiles”.
You can learn more about this concept in the configuring roles and profiles doc. I just want to explain in a simple way so that if you’re not too familiar with the Puppet doc, you’ll maybe gain something here.
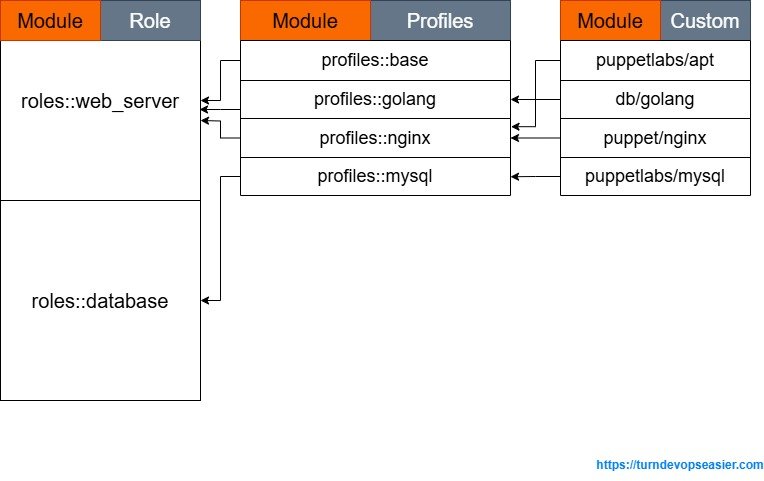
Basically, Roles and Profiles have 3 layers:
- Component modules – basically allow you to manage a particular technology. These modules are either from the built-in Puppet or developed by the community/yourself, for the community, they mainly are located in https://forge.puppet.com/. For example, if we want to install and manage Nginx – you either write a Nginx module yourself, or reuse a developed Nginx module in https://forge.puppet.com/modules/puppet/nginx/readme.
class profiles::nginx {
  # "include nginx" - this uses Nginx Module with default configuration if we don't specify anything to install and bootstrap nginx instance
  include nginx

  # Use resource defined in Nginx module to configure hosts that we want for nginx
  nginx::resource::server { 'kibana.myhost.com':
    listen_port => 80,
    proxy       => 'http://localhost:5601',
  }
}- Profiles – Wrapper classes that use multiple component modules to configure a layered technology stack. For example, if we want to have a base profile that configures all necessary things that a normal server needs, we have:
class profiles::base {
  # Set up external custom facts for all servers if they need
  include profiles::base::facts

  # Set up default packages for all servers
  include profiles::base::packages

  # Set up default python-related packages for all servers
  include profiles::base::python

  # Set up a standard hirachical directory structure for all servers
  include profiles::base::structure

  ...
} - Roles – Wrapper classes that use multiple profiles to build a complete system configuration. For example, if you have a class
roles::web_server {}, this contains profiles that a web server needs, similar toclass roles::databases {}, which contains profiles that a database server needs. We will have:
class roles::web_servers {
  # Install all necessary common things that a server in your system needs
  include profiles::base

  # profiles::nginx contains nginx module and other nginx-related configurations.
  include profiles::nginx

  # profiles::golang contains golang module and other golang-related configurations.
  include profiles::golang

  # profiles::mysql contains mysql module and other mysql-related configurations.
  include profiles::mysql
  ...
}

class roles::databases {
  # profiles::mysql contains mysql module and other configuration-related mysql.
  include profiles::mysql
}
As you see, we have reused the profiles::mysql class in both roles::web_servers and roles::databases without copying configuration code around nodes.
Set up Roles and Profiles
Ok, let’s start setting up and developing a small example for roles and profiles to understand more. If you haven’t set up Puppet Server and Agent, please view Step 1 to 3 from Setup Puppet 8 on Ubuntu 24.04 – Configuration Management for a scaling enterprise
In this blog, we will learn to deploy configuration for a web server that includes base setup, Nginx, Golang, and a Mysql server via Puppet Agent.
Systems Requirements:
- 3 x Ubuntu 24.04 – 1 Master & 2 Agents
- 2-4 processor cores (for master), agent needs at least 1 core.
- 3GB RAM and above (for master), agent needs at least 512MB.
- sudo access
| Hostname | IP address | Role |
| puppet-master.srv.local | 192.168.68.117 | Puppet Server |
| web-01.srv.local | 192.168.68.116 | Puppet Agent |
| db-01.srv.local | 192.168.68.113 | Puppet Agent |
All implemented files below are at https://gitlab.com/binhdt2611/puppet-demo/ as a reference.
1. Create Roles and Profiles directories
On puppet-master server, we go to the /etc/puppetlabs/code/environments/production/ directory and create a “site” directory which contains “profiles” and “roles”. Run the following command:
cd /etc/puppetlabs/code/environments/production/
sudo mkdir -p site/{profiles,roles}/manifests
Result:

Still in /etc/puppetlabs/code/environments/production/. Enable the created “site” directory as a module path for Puppet to search by running sudo nano environment.conf and add the following content to the bottom:
modulepath = site:modulesPress Ctrl + O and press Enter to save the content. Then press Ctrl + X to exit.
The setting means that Puppet treats site/ and modules/ directories as module paths to search.
2. Create corresponding profiles for each purpose
In this part, we will create a few profiles designed to serve various purposes. To simplify, we need at least following classes:
- profiles::base – contains the necessary common things that a server in your system needs. This class includes
- profiles::base::facts – set up an external Custom Facts directory where Puppet uses arbitrary executables or scripts as facts
- profiles::base::packages – install default packages that all our servers in the system needs
- profiles::base::structure – structure directories that all our servers should have when they’re launched.
- profiles::golang– contains the golang module and other golang-related configurations
- profiles::nginx – contains the nginx module and other nginx-related configurations.
- profiles::mysql – contains the mysql module and other mysql-related configurations.
Before creating classes, we need to install golang manually on puppet-master server first. This is for compiling and building a binary executable for web-demo project that we create later. You could read this docs for more information about Golang installation. In here, run:
cd ~
wget https://go.dev/dl/go1.24.2.linux-amd64.tar.gz
sudo tar -C /usr/local -xzf go1.24.2.linux-amd64.tar.gz
Run nano $HOME/.profile and add the following content at the bottom:
# set PATH so it includes user's private bin for go if it exists
if [ -d "/usr/local/go/bin" ] ; then
    PATH=$PATH:/usr/local/go/bin
fi
Press Ctrl + O and press Enter to save the content. Then press Ctrl + X to exit.
Run this command to make the new setting take effect
source $HOME/.profile
Check go version:
go version
Output:

2.1. Working on “profiles::base” class
Still on puppet-master server, before we create this class, we need to create its sub-classes that the class profiles::base includes. In the /etc/puppetlabs/code/environments/production/site/profiles/manifests directory, we create a “base” directory that contains .pp files that we write classes of profiles::base::facts, profiles::base::packages, and profiles::base::structure.
sudo cd /etc/puppetlabs/code/environments/production/site/profiles/manifests
sudo mkdir base
- After we have “base” directory, then create facts.pp file where it stores profiles::base::facts class
sudo touch base/facts.pp
Run sudo nano base/facts.pp and add the following content:
# Class: profiles::base::facts
#
# Setup External Custom Facts directories to store custom executable or scripts as facts
#
class profiles::base::facts {
  file {['/etc/facter/', '/etc/facter/facts.d/']:
    ensure => directory,
    purge  => true,
  }
}
Press Ctrl + O and press Enter to save the content. Then press Ctrl + X to exit.
- Continue creating packages.pp file where it stores profiles::base::packages class
sudo touch base/packages.pp
Run sudo nano base/packages.pp and add the following content:
# Class: profiles::base::packages
#
# Install the necessary packages for the host
#
class profiles::base::packages {
  $packages = [
    'socat',
    'net-tools',
  ]

  package { $packages:
    ensure => installed,
  }
}
Press Ctrl + O and press Enter to save the content. Then press Ctrl + X to exit.
- Then create structure.pp file where it stores profiles::base::structure class:
sudo touch base/structure.pp
Run sudo nano base/structure.pp and add the following content:
# Class: profiles::base::structure
#
# Set up system-wide file structure
#
class profiles::base::structure {
  # All created directories below will have owner and group are 'root'
  File {
    owner => 'root',
    group => 'root',
  }

  file {['/opt/', '/data', '/data/app']:
    ensure => directory,
  }
}
Press Ctrl + O and press Enter to save the content. Then press Ctrl + X to exit.
- Finally, in
/etc/puppetlabs/code/environments/production/site/profiles/manifests,we create base.pp file where it stores profiles::base class
sudo touch base.pp
We will have a file structure looks like:

Run sudo nano base.pp and add the following content:
# Class: profiles::base
#
# Set up base requirement for the entire system
#
class profiles::base {
  include profiles::base::facts
  include profiles::base::packages
  include profiles::base::structure
}
Press Ctrl + O and press Enter to save the content. Then press Ctrl + X to exit.
2.2. Working on “profiles::golang” class
In the /etc/puppetlabs/code/environments/production/site/profiles/manifests directory, create golang.pp file where it stores profiles::golang class
sudo touch golang.pp
Output:

To start using the db-golang module, we need to download it first. While it’s possible to write our own module from scratch, we’re using this one for the sake of speed and simplicity. The Puppet community also offers many well-maintained modules that can help reduce development time. However, in some cases, you may need to create a custom module tailored to your specific business logic—it really depends on your needs.
Since the “db-golang” module hasn’t been released officially to Puppet Forge, we have to download its package firstly from GitHub and install it locally. In an arbitrary directory, run:
wget -O ~/dp-golang-1.2.8.tar.gz https://github.com/danielparks/puppet-golang/releases/download/v1.2.8/dp-golang-1.2.8.tar.gz

sudo /opt/puppetlabs/bin/puppet module install ~/dp-golang-1.2.8.tar.gz
Output:

Run sudo nano golang.pp and add the following content:
# Class: profiles::golang
#
# Install golang for web server
#
class profiles::golang {
  # Install the latest golang binary
  include golang
}
Press Ctrl + O and press Enter to save the content. Then press Ctrl + X to exit.
2.3. Working on “profiles::nginx” class
For this demo, since we’re using Golang, we first need to compile our web app into a binary executable. Once built, we’ll add this binary to Puppet so it can be deployed to our web servers. In a real-world scenario, projects are typically stored in a source control system like GitHub or GitLab, etc…, and Puppet would be used to clone and deploy them directly. However, for the sake of simplicity and speed, I’ll create a small demo project directly on the puppet-master server. To begin, we run:
cd ~
mkdir web-demo
cd web-demo
touch main.go
Run nano main.go and add the following code into the file:
package main

import (
	"errors"
	"fmt"
	"io"
	"net/http"
	"os"
)

func main() {
	mux := http.NewServeMux()
	mux.HandleFunc("/", getRoot)

	err := http.ListenAndServe(":3000", mux)
	if errors.Is(err, http.ErrServerClosed) {
		fmt.Printf("server closed\n")
	} else if err != nil {
		fmt.Printf("error starting server: %s\n", err)
		os.Exit(1)
	}
}

func getRoot(w http.ResponseWriter, r *http.Request) {
	io.WriteString(w, "Welcome to my website!\n")
}
Press Ctrl + O and press Enter to save the content. Then press Ctrl + X to exit.
Run go mod to create a mod file where we manage go modules and the default binary file name:
go mod init example.com/web-demo
Output:

Build a Golang binary executable file by running:
go build
We’ll have a web-demo binary file in the same “web-demo” directory:

We need to copy this generated web-demo binary file into puppet files/ directory where nodes (agents) can download from, we run:
# we actually can simply put web-demo file into files/ but I've created a sub directory to organise and know this file belongs to which class
# E.g. profiles::nginx class has files/nginx
mkdir -p /etc/puppetlabs/code/environments/production/site/profiles/files/nginx/web-demo
sudo cp ~/web-demo/web-demo /etc/puppetlabs/code/environments/production/site/profiles/files/nginx/web-demo
NOTE:
roles/andprofiles/directories havefiles/directory and other directories inside. See module structure to understand the meaning of these directories.
Create a web-demo.service file to run the “web-demo” app with systemd, and add it to /etc/puppetlabs/code/environments/production/site/profiles/files/nginx
Run:
sudo nano /etc/puppetlabs/code/environments/production/site/profiles/files/nginx/web-demo.service
And add the following content:
[Unit]
Description=Web Demo App
Wants=basic.target
After=basic.target network.target

[Service]
ExecStart=/data/app/web-demo
KillMode=process
Restart=always
RestartSec=10s

[Install]
WantedBy=multi-user.target
Press Ctrl + O and press Enter to save the content. Then press Ctrl + X to exit.
Now, we create nginx.pp file where it stores profiles::nginx class
cd /etc/puppetlabs/code/environments/production/site/profiles/manifests
sudo touch nginx.pp
Similar to golang module, we need to download puppet-nginx and puppetlabs-apt modules to use it in our profiles::nginx class, no need to manually download the module because the Nginx module is available on module repository. In an arbitrary location, run:
sudo /opt/puppetlabs/bin/puppet module install puppet-nginx
Output:

sudo /opt/puppetlabs/bin/puppet module install puppetlabs-apt
Output:

NOTE: if you don’t download puppet-nginx module, you can’t add include nginx in the profiles::nginx class
Run sudo nano nginx.pp and add the following content:
# Class: profiles::nginx
#
# Set up web server that includes nginx-related configuration
#
class profiles::nginx {
  include nginx

  $web_demo_name = 'web-demo'

  # Set up the "web-demo" binary file to path /data/app/
  file { "/data/app/${web_demo_name}":
    ensure => file,
    source => "puppet:///modules/profiles/nginx/${web_demo_name}/${web_demo_name}",
    mode   => '0755',
  }

  # Configure "web-demo" systemd service to run "/data/app/web-demo"
  file { "/etc/systemd/system/${web_demo_name}.service":
    ensure => file,
    mode   => '0644',
    owner  => 'root',
    group  => 'root',
    source => "puppet:///modules/profiles/nginx/${web_demo_name}.service",
    notify => Exec["${web_demo_name}-systemd-reload"],
  }

  # Reload daemon only after configuring systemd
  exec { "${web_demo_name}-systemd-reload":
    command     => 'systemctl daemon-reload',
    path        => ['/usr/bin', '/bin', '/usr/sbin'],
    refreshonly => true,
  }

  # Start "web-demo" service to listen requests sent from Nginx
  service { $web_demo_name:
    ensure  => running,
    require => [File["/data/app/${web_demo_name}"], File["/etc/systemd/system/${web_demo_name}.service"]],
  }

  # Configure Nginx host to forward requests to the "web-demo" app
  nginx::resource::server { 'my-webserver.srv.local':
    listen_port => 80,
    proxy       => 'http://localhost:3000',
  }
}
Press Ctrl + O and press Enter to save the content. Then press Ctrl + X to exit.
So far, we have file structure for profiles::nginx class looks like:

2.4. Working on “profiles::mysql” class
Still in /etc/puppetlabs/code/environments/production/site/profiles/manifests, we create mysql.pp file where it stores profiles::mysql class
sudo touch mysql.pp
We also need to download puppetlabs-mysql module to use it in our profiles::mysql class. In an arbitrary location, run:
sudo /opt/puppetlabs/bin/puppet module install puppetlabs-mysql
Output:

Run sudo nano mysql.pp and add the following content:
# Class: profiles::mysql
#
# Install MySQL for a database server
#
class profiles::mysql {
  # Install MySQL server
  class { 'mysql::server':
    root_password           => 'strongpassword',
    remove_default_accounts => true,
    restart                 => true,
  }

  # Create a 'my-demo-db' database
  mysql::db { 'my-demo-db':
    user     => 'myuser',
    password => 'mypass',
    host     => 'localhost',
    grant    => ['SELECT', 'UPDATE'],
  }
}
Press Ctrl + O and press Enter to save the content. Then press Ctrl + X to exit.
Ok. Now we completed all necessary classes for “profiles”, and have file structure for all classes in profiles/ directory below

3. Create corresponding roles for setting up particular servers
With created profiles at section 2, we now need to create role classes for each particular server group, and these role classes will include defined profiles with the corresponding configuration, e.g. web-01, will use the configuration for the roles::web_server class instead of adding each node with duplicate configuration. We’ll create following classes:
- roles::base – contains:
- profiles::base
- roles::web_server – inherits from roles::base and contains:
- profiles::golang
- profiles::nginx
- roles::database – inherits from roles::base and contains:
- profiles::base
- profiles::mysql
3.1 Working on “roles::base” class
Go to /etc/puppetlabs/code/environments/production/site/roles/manifests, create base.pp to store roles::base class that specifies which profiles should be used in this class.
cd /etc/puppetlabs/code/environments/production/site/profiles/manifests
sudo touch base.pp
Run sudo nano base.pp and add the following content:
# Class: roles::base
#
# Install base configurations on all servers
#
class roles::base {
  include profiles::base
}
Press Ctrl + O and press Enter to save the content. Then press Ctrl + X to exit.
3.2 Working on “roles::web_server” class
Continue creating web_server.pp, it stores roles::web_server class that specifies profiles needed for a web server:
sudo touch web_server.pp
Run sudo nano web_server.pp and add the following content:
# Class: roles::web_server
#
# Inherit configurations from roles::base and install configurations for a web server
#
class roles::web_server inherits roles::base {
  include profiles::golang
  include profiles::nginx
}
Press Ctrl + O and press Enter to save the content. Then press Ctrl + X to exit.
3.3 Working on “roles::database” class
Finanlly, we create database.pp, it stores roles::database class that specifies profiles needed for a database server:
sudo touch database.pp
Run sudo nano database.pp and add the following content:
# Class: roles::database
#
# Inherit configurations from roles::base and install configuration for a database server
#
class roles::database inherits roles::base {
  include profiles::mysql
}
Press Ctrl + O and press Enter to save the content. Then press Ctrl + X to exit.
Ok, we finally completed all code for testing this demo. The file structure in /etc/puppetlabs/code/environments/production/site finally looks like:

4. Configuring Hiera to let servers use the corresponding roles
Puppet has a powerful feature called Hiera, which allows us to make our Puppet code reusable and configurable without directly modifying the Puppet classes. Instead, we simply update Hiera for each server. Even if multiple servers share the same role classes, they can still have different configurations based on the values defined in Hiera.
In this part, we will specify which server should use which role class. I won’t explain Hiera too details in this article as it will take forever to complete. Basically, take a look at the default content of /etc/puppetlabs/code/environments/production/hiera.yaml file:
---
version: 5
defaults:
  # The default value for "datadir" is "data" under the same directory as the hiera.yaml
  # file (this file)
  # When specifying a datadir, make sure the directory exists.
  # See https://puppet.com/docs/puppet/latest/environments_about.html for further details on environments.
  # datadir: data
  # data_hash: yaml_data
hierarchy:
  - name: "Per-node data (yaml version)"
    path: "nodes/%{::trusted.certname}.yaml"
  - name: "Other YAML hierarchy levels"
    paths:
      - "common.yaml"
Annotation:
- version: default Hiera version now is 5
- defaults: Used for any hierarchy level that omits those defined keys. Example: The setting
datadir: datawill make the Hiera search all files/folders defined in “hierarchy” below in the/etc/puppetlabs/code/environments/production/data/folder - hierarchy: simply where Hiera will search data in order. From the default, data that we set in
"nodes/%{::trusted.certname}.yaml"will override the same data we set in"common.yaml"
We now need to guide web servers to use roles::web_server, and database servers will use roles::database as well. This "nodes/%{::trusted.certname}.yaml" will let us do that, the %{::trusted.certname} is a interpolate variable where it utilises the Facts collected from Puppet Agent.
For example: when we run puppet command on the web-01.srv.local server – %{::trusted.certname} returned to web-01.srv.local while Hiera searching.
Run the following commands to set up Hiera data:
cd /etc/puppetlabs/code/environments/production/data/
sudo mkdir nodes
sudo touch nodes/web-01.srv.local.yaml
sudo touch nodes/db-01.srv.local.yaml
sudo touch common.yaml
Run sudo nano nodes/web-01.srv.local.yaml and add the following content:
---
# Let Hiera knows that web-01 should use 'roles::web_server'
server::role: 'roles::web_server'
Press Ctrl + O and press Enter to save the content. Then press Ctrl + X to exit.
Run sudo nano nodes/db-01.srv.local.yaml and add the following content:
---
# Let Hiera knows that db-01 should use 'roles::database'
server::role: 'roles::database'
Press Ctrl + O and press Enter to save the content. Then press Ctrl + X to exit.
Next, we need to specify how Puppet look for node definitions in the main manifest file (/etc/puppetlabs/code/environments/production/manifests/site.pp)
cd /etc/puppetlabs/code/environments/production
sudo nano manifests/site.pp
If you would follow Step 4 from Setup Puppet 8 on Ubuntu 24.04 – Configuration Management for a scaling enterprise, you may need to change the content:
from:
node 'web-01.srv.local' {
   include nginx
}
to:
node default {
  lookup('server::role', {merge => unique}).include
}
Press Ctrl + O and press Enter to save the content. Then press Ctrl + X to exit.
And also run:
sudo rm /etc/puppetlabs/code/environments/production/manifests/init.pp
If you just completed Step 1 to 3 from Setup Puppet 8 on Ubuntu 24.04 – Configuration Management for a scaling enterprise, simply add:
node default {
  lookup('server::role', {merge => unique}).include
}
5. Testing configuration on servers
5.1 Testing web-01 server
Now, we have all puppet code ready for our setup requirement, we need to log in web-01 server to run “puppet agent” command to pull the new configuration from puppet-master server.
sudo /opt/puppetlabs/bin/puppet agent -t
Output:

You may see Puppet agent downloads modules like this, let it run….

Then it starts applying Puppet configurations – we can see all configurations that we defined have been applied:

…

Checking result for profiles::base::facts:

Checking result for profiles::base::packages:

Checking result for profiles::base::structure:

Checking result for profiles::nginx – web-demo.service is running as it’s started by Puppet.

We need to edit hosts file (Windows: C:\Windows\System32\drivers\etc and Linux/Mac: /etc/host) from our local machine and add this my-webserver.srv.local domain pointing to the IP of web-01.srv.local to test accessing the website.
192.168.68.116 my-webserver.srv.localOpen your browser and access: http://my-webserver.srv.local

Great! We configured our site successfully!
Checking result for profiles::golang:

5.2 Testing db-01 server
On db-01 server, we run:
sudo /opt/puppetlabs/bin/puppet agent -t
Output:

Checking MySQL service is started by puppet

Login MySQL with user: root – password: strongpassword as defined via profiles::mysql class. We will find that “my-demo-db” database and user “myuser” are created

Congratulations! We have gone through a lot of steps to implement “Roles and Profiles” in Puppet. I hope you enjoy it. You may find that we have to do it manually a lot in the Puppet server, and probably wondering whether we have a better way to manage this stuff in the “production” environment.
I’ve written Efficient Puppet Code Deployment using r10k to show how to use r10k to manage Puppet code through GitLab so that we can use different environments to test our new feature before really merging it into the “production” environment. It’s a good practice to enhance the consistency in your Puppet code and trace back what you have done with your system.
Share this:
Discover more from Turn DevOps Easier
Subscribe to get the latest posts sent to your email.