If you come from my previous blog, Mastering Puppet: Implementing Roles and Profiles Effectively In Reality, I’ve discussed managing Puppet code more efficiently by using puppet r10k. In this blog, I’ll walk you through the configuration process so that it saves you hours of digging into Puppet docs.
If you are new or just getting to know Puppet, this will help you later in organising your Puppet code.
What is r10k?
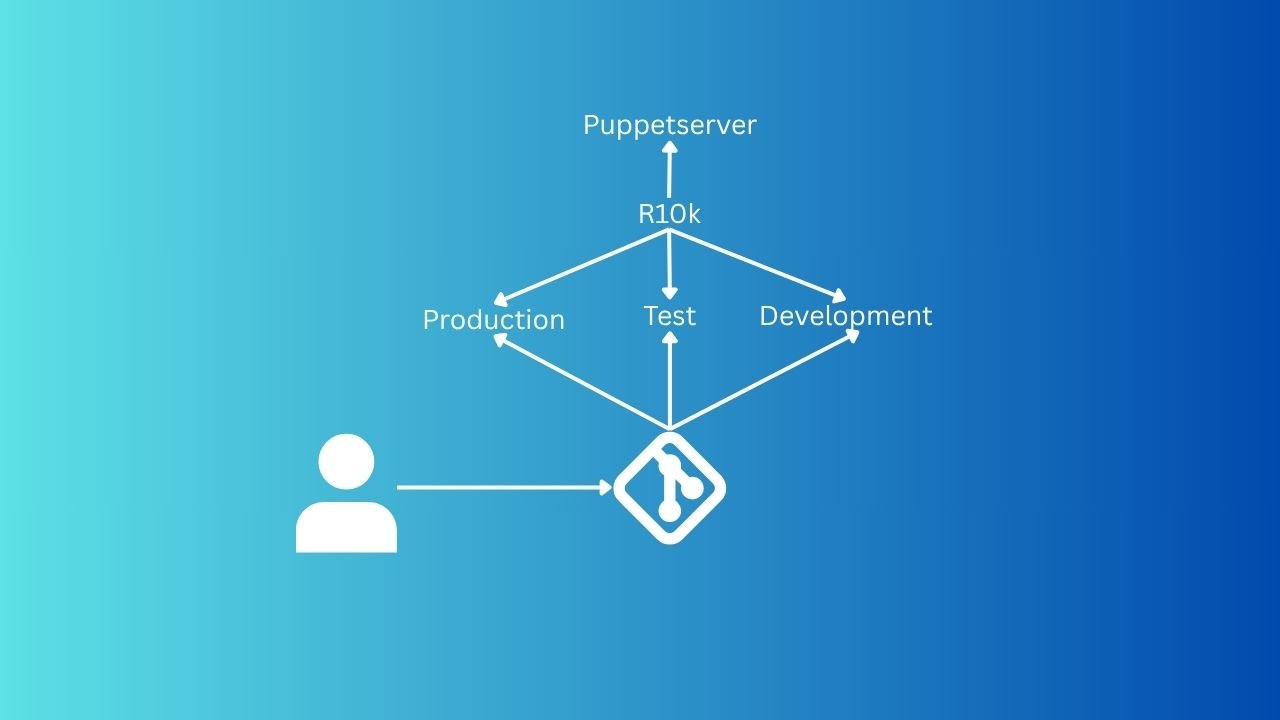
r10k is a code management tool that allows you to easily manage your entire Puppet code in a source control repository (such as Git, GitLab, GitHub, etc.), where it helps you deploy configurations in environments such as production, test, and development. These environments are known as branches in Git, and the production (default in Puppet) is known as the default main in Git. We have to change main to production.
Why do we need r10k?
If you have used or started using Puppet to deploy configuration to Puppet Agents, you probably know that we usually add our Puppet code, modules, and Hiera config into the directory /etc/puppetlabs/code/environments/production/manifests/. Let’s imagine you have a bunch of configurations for so many server types with a lot of custom modules, scripts, and files for each service. It might become tedious and hard to manage when you have to create, develop, and test Puppet code manually in that directory.
Managing all that stuff in a source control repository makes our lives easier. The most important way is that when there’s something wrong with the new changes that you shipped to the production environment, you can easily roll back to the previous configuration by using git revert instead of doing the process manually. And just use r10k to deploy your reversion to bring everything back. Or more usefully, when you test your new changes in the test environment, and if you find something wrong, you can easily run the production environment to bring the machine back to its original running state.
Prerequisites
- Have knowledge of Puppet
- Knowing how to set up a Git repository locally and create/configure a project on GitLab/GitHub.
- Knowing how to configure SSH key for a Git repository to read from the source control system (SCS). I’m using GitLab here. The logic can be applied to GitHub or other sources.
- Have Ubuntu 24.04 with a puppet-master server installed – check out Setup Puppet 8 on Ubuntu 24.04 – Configuration Management for a scaling enterprise to know more.
Installing and Configuring r10k
1. Set up your code repository with the necessary files and folders
Before you install r10k, you must set up your own code repository. I’m using GitLab in this blog, so you can follow if you also use GitLab. Following Mastering Puppet: Implementing Roles and Profiles Effectively In Reality, I have all the written codes in the directory /etc/puppetlabs/code/environments/production/manifests/.

I will create a project folder called “puppet-demo” under my local machine, and will copy these files and folders (except the modules/ directory) above into it.
Then, in the “puppet-demo,” we need to create a “Puppetfile” file (required for r10k to manage modules in our environments). Use your editor (e.g., VSCode, Notepad, etc.) to edit the file and paste the content below into the file.
forge 'https://forgeapi.puppetlabs.com'

mod 'puppetlabs-concat', '9.1.0'
mod 'puppet-archive', '7.1.0'
mod 'puppetlabs-stdlib', '9.7.0'
mod 'puppetlabs-apt', '10.0.1'
mod 'puppet-nginx', '6.0.1'
mod 'dp-golang', '1.2.8'
It would be like this in VSCode:

In the previous blog, I have used these modules for the demo, that’s why I have to declare them here. If you don’t follow the previous blog, your modules might not look the same.
Note: Puppetfile does not automatically resolve module dependencies when downloading from Forge. When you declare a module in your Puppetfile, you must also declare any required dependent modules. For example, “puppet-nginx” module requires “puppetlabs-apt”
Next, we will create a r10k.yaml file to store r10k configuration so that we can use it at a later step. Use your editor again to create this file with content:
---
# Store all cache information in /var/cache
cachedir: '/var/cache/r10k'

sources:
  puppet:
    # Change 'remote' to your remote repository path (GitHub or GitLab, etc.)
    remote: 'git@gitlab.com:binhdt2611/puppet-demo.git'
    # Directory where we want r10k pull branches as environments into
    basedir: '/etc/puppetlabs/code/environments'
For more information on r10k configuration, please check it here.
Output in VSCode:

Finally, you must have a minimum of files and folders like below:

You will need to push this repository to the remote source control repository that you’re using.
You may want to check out my https://gitlab.com/binhdt2611/puppet-demo as a reference to see what files and folders look like.
2. Configure SSH key for puppet-master server
You can skip this step if you have configured SSH keys on your puppet master server already. If you haven’t, maybe this will be helpful for you.
On the puppet-master server, please log in as “root” to configure. If you use your own user, you should be aware of permission issues. Run these commands to install Git if you haven’t done so.
apt update
apt install git -y
Then, we generate an SSH key pair:
ssh-keygen -t ed25519 -P '' -f /root/.ssh/id-control_repo.ed25519
Output:

We need to copy the content of the generated public key, which is in /root/.ssh/id-control_repo.ed25519.pub, we run:
cat /root/.ssh/id-control_repo.ed25519.pub
Output to something looks like:
ssh-ed25519 xxxxxxxxxxxxxxxxxxxxxxxxxxxxxxxx root@your-fqdnCopy the content from the output. We now go to GitLab to configure the deploy key with our public key in order to allow the puppet master to pull the “puppet-demo” repository from GitLab (it might be different in GitHub, but the logic is the same; you have to upload your SSH public key to GitHub).

Then, set up a Git host config file at /root/.ssh/config on puppet-master server to tell the server which SSH private key it should use. Run:
cat <<EOF > /root/.ssh/config
PasswordAuthentication no
CheckHostIP no
Host gitlab.com
  Hostname gitlab.com
  PreferredAuthentications publickey
  IdentityFile ~/.ssh/id-control_repo.ed25519
EOF
Testing SSH connection to GitLab, run ssh -T git@gitlab.com, you should have output similar as result:

Now, we clone the “puppet-demo” repository to puppet-master. Run:
mkdir -p /data/ && cd -
git clone git@gitlab.com:binhdt2611/puppet-demo.git puppet-demo
Output:

3. Installing r10k
Still on puppet-master server, to install r10k, we simply run:
/opt/puppetlabs/puppet/bin/gem install r10k
If r10k is installed correctly, we can test by running:
/opt/puppetlabs/puppet/bin/r10k help
Output:

Next, we configure r10k to be able to deploy puppet-demo project into the corresponding environments. Run:
mkdir -p /etc/puppetlabs/r10k
ln -s /data/puppet-demo/r10k.yaml /etc/puppetlabs/r10k/r10k.yaml
Result:

Deploy code from the production branch to the production environment on puppet-master server, run:
/opt/puppetlabs/puppet/bin/r10k deploy environment -m -v
Output:

With:
-m: deploy modules-v: verbose
Ok. We’re done configuring r10k and have deployed the production environment successfully.
Testing r10k
We will create a development branch from the production branch on the local machine. In the “puppet-demo” project directory on your local machine. Run
git checkout -b development
(Optional) You can skip this step if you like and just create a branch. I’m continuing the previous blog to show the case. In here, using VSCode to update class profiles::base::packages to append “htop” package, it looks like below:

Commit and push your changes
git add . && git commit -m "#feat - Add htop package"
git push origin development
Go back to your puppet-master server. Run r10k command again:
/opt/puppetlabs/puppet/bin/r10k deploy environment -m -v
Output:

You will see that the new development branch is deployed as development environment along with the default production environment to the puppet-master server.
From now on, you can continue to commit/push your changes to the development branch and deploy them to the puppet-master server by running r10k. If you want to automate the deployment process, you can add a cron task to automatically deploy every 5 minutes. Simply run:
cat <<EOF > /etc/cron.d/r10k-deploy
*/5 * * * * root /opt/puppetlabs/puppet/bin/r10k deploy environment -m
EOF
That’s when you don’t have to run r10k manually anymore. The cron task will roll out changes that you push to any branch in the remote repository to the puppet-master environments for you.
To test the new “htop” package defined in the development branch, I will use the web-01 server I created in the previous blog. By default, the Puppet Agent uses production environment. In this case, we have to specify the web-01 server to use development environment by running:
sudo /opt/puppetlabs/bin/puppet agent -t --environment=development
Output:

Congratulations, you can now develop as many testing features as you can in other branches (environments). Once you verify those features work properly on those branches, you can merge those branches into the production branch to keep Puppet code consistent.
Optional: If you want to look for another version of r10k, we have g10k written in Golang. I have never tried it, but it looks like it’s gaining traction and claims to have better performance than r10k. Just noting this here in case you want to try it.
My thoughts
So far, we have learned that r10k helps us deploy server configurations to environments (production, etc.). Additionally, we can release configurations from these environments to servers that track the corresponding environment (defaulting to the production environment on all servers).
Apart from that, I just want to share that Puppet itself can also be used to release your own software application if you prefer. The software application could be anything you write in a programming language. It could be a website, chat app, music app, etc. If you don’t have a CI/CD system (built by e.g., GitLab, Jenkins, GitHub, etc.) to release your application, Puppet can become a candidate to do this job.
As you have seen, in the last step above, where I ran puppet agent -t on the web-01 server to apply the new htop package defined in the code, we actually don’t need to run it manually like that if we start puppet.service. By default, the Puppet Agent (on web-01) will run at a 30-minute interval (we can adjust the interval as well). So whatever we push to the production branch, and then r10k releases the new changes to the production environment, the Puppet Agent will automatically apply new changes it detects from the Puppet Server onto the agent servers.
With that being said, we can write Puppet code to keep track of your application repository (on GitLab or any SCS), tracking the app either by tag or version that you defined yourself. The Puppet Agent will ensure that the server on which your application is running will always have the exact version we set.
Later, if we want to release a new version of your code, that’s when we just update the version we defined in Puppet and release it to the production environment ( r10k does this). The Puppet Agent will release the newly defined application version for us automatically.
This is just a rough idea of how we can achieve the automatic release. We can eventually create a better workflow depending on how complicated your release would be.
I myself still prefer to build a separate CI/CD system using GitLab or a similar tool to achieve this. The reason is that if we use Puppet, we might end up building a combination of different scripts, tools, and services, requiring significant time to manage and maintain, just to achieve the release feature (sometimes we have to factor in the rollback feature).
Whereas having a separate CI/CD system to release your own application gives you more control. I have mentioned GitLab; it’s just a personal choice. I want to share that using GitLab CI/CD has helped me consolidate a lot of components (Jenkins, custom scripts, custom systems, AWS CodeDeploy, and a part of Puppet) into a single tool, which reduces cost and management effort. I don’t know of other solutions. If you have, please feel free to comment below and let me hear about it.
The main idea is to know the right tool for the right job, and I think it has to align not only with the capabilities of your team but also with the company’s future plan, whether you need a separate CI/CD system or not. So, it’s best that you take those into account when you want to implement a CI/CD system for your application.
Thanks for reading. If you like the blog, please hit the Like/Share button to encourage me to write more blogs. Thank you.
Share this:
Discover more from Turn DevOps Easier
Subscribe to get the latest posts sent to your email.