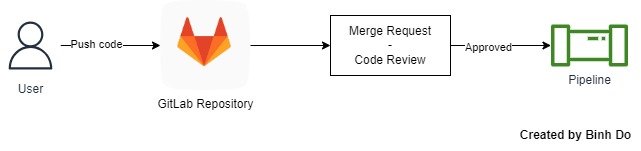
Depending on the workflow of each company, when we push code to the remote repository for code review, we sometimes want to trigger our GitLab CI/CD pipeline immediately only when a merge request is approved.

GitLab CI/CD doesn’t provide a direct way for us to achieve this. However, I’ll want to show you a workaround solution by using GitLab Webhook combined with a custom script so that we can trigger our pipeline via GitLab APIs when we click on the “Approve” button on a merge request (MR). The pipeline is triggered either to do some tasks or automatically merge the MR into the target branch. This method requires some coding skills, I’ll share a simple code to let you understand the solution. You can keep developing the code based on your own requirements.
There are 2 key things you should be aware of:
- $CI_MERGE_REQUEST_APPROVED: is the approval status of the merge request and is a pre-defined variable as stated in the docs. Set to
truewhen “merge request approvals is available” and the “merge request has been approved”. If you’re using a free account, you can’t use this feature until you upgrade to a Premium or Ultimate account or build a GitLab server by yourself. By default, the value of this variable isnullwhen it hasn’t been approved. - GitLab Webhook events: check out merge request events to see what GitLab sends us in the event, we will use the data in the payload to handle when we should trigger CI/CD pipelines in an MR. The docs said that we can use Webhook events to “Trigger continuous integration (CI) jobs, update external issue trackers, update a backup mirror, or deploy to your production server.“
Here are the main steps we need to follow:
- Create a personal access token that we will use it to trigger a pipeline on an MR of a project.
- Add
rulesto jobs in.gitlab-ci.ymlfile so that the job is triggered based on the workflow we want. - Configure Gitlab Webhook for sending merge request events to our custom Webhook Receiver script.
Step 1 – Create a personal access token
First, there are a few ways to trigger a pipeline in our project, one of them is to use GitLab API. However it requires us to have either a personal access token or a project/group access token to authenticate GitLab API. In this example, I’m using a personal access token, let’s create this.
On Gitlab Console, click the user icon -> select Edit profile -> then select Access Tokens -> click Add new token -> Then enter Token name -> select “api” permission only -> click Create personal access token

You’ll get an result that looks like below, please copy your token and save it somewhere else safely, we’ll use it later in our custom script:

Next, we’ll need to configure merge request approvals by going to Gitlab Console of your project -> select Settings on the left navigation column -> select Merge requests -> Under Merge request approvals section (appears on Premium, Ultimate, or self-hosted only), add 1 to All eligible users -> then click Save changes

Step 2 – Adding rules to the .gitlab-ci.yml file
In your .gitlab-ci.yml file, add the rule like below under your jobs. Here is my example, but you can see the rules I’ve set there for references.
default:
  image: alpine:3.18.4

stages:
  - test
  - deploy

test-code:
  stage: test
  script:
    - echo "CI_MERGE_REQUEST_APPROVED - ${CI_MERGE_REQUEST_APPROVED}"
    - echo "This pipeline is triggered after the merge request is approved"
  rules:
    - if: $CI_MERGE_REQUEST_TARGET_BRANCH_NAME == $CI_DEFAULT_BRANCH && $CI_MERGE_REQUEST_APPROVED

# Run this pipeline when we merge a merge request into the "main" branch, or when we push directly to the "main" branch
deploy-code:
  stage: deploy
  script:
    - echo "This pipeline is triggered only on main branch"
  rules:
    - if: $CI_COMMIT_REF_SLUG == $CI_DEFAULT_BRANCH
For the “test-code” job above, the rule means the CI job is triggered only when this is a merge request AND is merging into “main” branch AND the merge request must be approved. So when you create e.g. “test-branch”, and push codes to this branch. No pipeline is triggered. Even when you create an MR for this “test-branch” to merge into “main” branch. The pipeline is still not triggered. Once we click the “Approved” button on the MR, the pipeline won’t be triggered as GitLab doesn’t have that feature even though the $CI_MERGE_REQUEST_APPROVED now has been set to true. We will be triggering this pipeline by API in the next few steps.
The “deploy-code” job is to run only when the MR has been merged into master.
Step 3 – Configure GitLab Webhook
In this step, we have 2 sub-steps, these steps are the most important ones to make us achieve the result. Those are:
- Configure GitLab Webhook to watch merge request events in our own project (in this example is “testing-project”). It means when we push code to an MR or do anything to the MR, those actions will be recorded in JSON format, which is called Payloads. You can check out this GitLab Webhook’s merge request events section to see the Payloads example when an action occurs in your MR.
- Build a custom script, which I called Webhook Receiver for receiving the Payloads sent from the GitLab Webhook. The custom script will extract the Payload’s data which contains actions such as
open,closed,reopen,updateapproved,unapproved,approval, andmerge. From there, the only action we care about is “approved“, once our script receives signals of this action, the script will trigger pipelines on our MR immediately.
Build a Webhook Receiver
Before we configure GitLab Webhook, we’ll need to build our Webhook Receiver first, then we can have an URL where we can paste into the config section of GitLab Webhook. You’ll know what I mean in the next few steps.
I’m building a quick Webhook Receiver script in Python by using Flask API, a RESTful web service in the Flask framework. You’re free to use any language you know. Another thing is that you’ll need to have your own server where you run this script, e.g. choose any VPS or EC2 server. In this guide, I simply use ngrok program to create a random URL so that I can run the Webhook Receiver script on my local computer.
Install Python and the Flask package
First, make sure you have installed python 3.8 at least and also installed Flask package. You can search on the internet for how to install python, so I won’t show you the installation steps here. I’m assuming that you have python installed. If you haven’t installed the Flask package. Can run this command:
pip install Flask
Create a secret key
We use this secret key for authentication between GitLab Webhook and our Webhook Receiver. In python 3, we can run this command to generate a random string:
python -c "import os; print(os.urandom(24).hex())"
A random string generated looks similar to below (your random string will be different):
e850d0605bfffd9e731d6374376aa36b7c1fd23997e0ff84As best practice, we shouldn’t add this secret key directly to the code repository. Thus, under the directory where you store your webhook script. Create a config.py file, e.g.
mkdir -p /data/webhook_receiver
cd /data/webhook_receiver
touch config.py
Then add the generated random string and the personal access token created in Step 1 into the config.py file with content:
SECRET_KEY = "e850d0605bfffd9e731d6374376aa36b7c1fd23997e0ff84"
PIPELINE_TRIGGER_TOKEN = "<your_personal_access_token>"
Create a custom Webhook Receiver script.
Under /data/webhook_receiver directory, we create webhook_receiver.py file.
touch webhook_receiver.py
Run nano webhook_receiver.py and add the content as below:
from flask import json
from flask import request, Response
from flask import Flask
import requests
import hashlib
import hmac
import base64
import threading

# Create and configure the app
app = Flask(__name__)
app.config.from_pyfile('config.py')

# Get variables from the config.py file
SECRET_KEY = app.config.get('SECRET_KEY')
PIPELINE_TRIGGER_TOKEN = app.config.get('PIPELINE_TRIGGER_TOKEN')

# GLOBAL VARIABLES
GITLAB_API_V4_URL = "https://gitlab.com/api/v4"

# Create a Function that compares the computed signature to the one in the request
def verify_gitlab_signature(body, signature, secret_key):
    """
    verify_gitlab_signature compares the computed signature to the one in the request,
    and return a boolean result.

    Parameters
    ----------
    :param body: a raw request body
    :param signature: Request Header with "X-Gitlab-Token"
    :param secret_key: Local webhook token.
    """
    secreteDigest = hmac.new(bytes(secret_key, "utf-8"), body, hashlib.sha256).digest()
    encodedSecret = base64.b64encode(secreteDigest).decode()

    signatureDigest = hmac.new(bytes(signature, "utf-8"), body, hashlib.sha256).digest()
    encodedSignature = base64.b64encode(signatureDigest).decode()

    return hmac.compare_digest(encodedSecret, encodedSignature)

def trigger_mr_pipeline(project_id, mr_iid, trigger_token):
    """
    trigger_mr_pipeline function creates a pipeline on MR IID,
    and return a String of the merge request URL.

    Parameters
    ----------
    :param project_id: id of the checking project
    :param mr_iid: real id of the merge request on the project
    :param token: private api token of user gitlab.
    """

    TRIGGER_URL = f"{GITLAB_API_V4_URL}/projects/{project_id}/merge_requests/{mr_iid}/pipelines"
    try:
        trigger = requests.post(
            TRIGGER_URL,
            headers={"PRIVATE-TOKEN": "{}".format(trigger_token)}
        )
    except requests.exceptions.HTTPError as error:
        print(error)

    return trigger.json()["web_url"]


# We create a URI /webhooks with POST method so that GitLab send Payloads to this Webhook Receiver by POST Method
@app.route("/webhooks", methods=["POST"])
def handle_webhook():
    assert request.path == "/webhooks"
    assert request.method == "POST"

    # Get raw request body
    body = request.get_data()

    # Get request signature
    signature = request.headers["X-Gitlab-Token"]

    # Checking signature
    sanityCheck = verify_gitlab_signature(body, signature, SECRET_KEY)

    if not sanityCheck:
        msg = {
            "event_type": "merge_request",
            "success": False,
            "message": "Failed to verify signature"
        }
        return Response(json.dumps(msg), status=400, mimetype="application/json")

    data = request.get_json()

    # Check if the sent event is a GitLab Merge Request Event
    if request.headers["X-Gitlab-Event"] == "Merge Request Hook":

        # Start a new thread to process the incoming request for merge request hook
        # Handle multiple imcoming requests at the same time.
        mr_thread = threading.Thread(target=process_webhook_request, args=(data, ))
        mr_thread.start()

        event = {
            "event_type": "merge_request",
            "success": True,
            "message": "Received successfully!",
        }
        return Response(json.dumps(event), status=200, mimetype="application/json")
    else:
        msg = {
            "event_type": "merge_request",
            "success": False,
            "message": "Request is not 'Merge Request Hook'"
        }
        return Response(json.dumps(msg), status=400, mimetype="application/json")


# Create process_webhook_request function to process
def process_webhook_request(data):

    # Re-assign data variable
    message = data

    # We extract some necessary data from the Payloads
    # To trigger a pipeline on a project's merge request,
    # We'll need:
    #     - project_id: is the id of the project
    #     - mr_iid: is the id of the merge request we want to trigger pipeline on it
    #     - mr_action: is the action we received from the Payloads which indicates
    #                  what a user have done on that MR.
    project_id         = str(message["project"]["id"])
    mr_iid            = str(message["object_attributes"]["iid"])

    # Condition to check "action" field is existed.
    if "action" in message["object_attributes"]:

        mr_action         = message["object_attributes"]["action"]
        # Trigger pipeline run when someone approves a MR request
        if mr_action == "approved":

            pipeline = trigger_mr_pipeline(project_id, mr_iid, PIPELINE_TRIGGER_TOKEN)
            app.logger.info(f"Created Pipeline URL: {pipeline}")

if __name__ == "__main__":
    app.run(host="0.0.0.0", port=9001, debug=True)
Press Ctrl + O and press Enter to save the content. Then press Ctrl + X to exit.
Run the Webhook Receiver script and expose it with the URL by using ngrok.
Install the ngrok program. Depending on your OS, I’m using WSL with Ubuntu on Windows.
curl -s https://ngrok-agent.s3.amazonaws.com/ngrok.asc | sudo tee /etc/apt/trusted.gpg.d/ngrok.asc >/dev/null

echo "deb https://ngrok-agent.s3.amazonaws.com buster main" | sudo tee /etc/apt/sources.list.d/ngrok.list

sudo apt update && sudo apt install ngrok
Add an authentication token for ngrok, you may have to sign up ngrok account first on their website to get your own token. Check out this docs for more details
ngrok config add-authtoken
Start a tunnel to forward incoming requests to your own Webhook Receiver script which is running on port 9001.
ngrok https 9001
We should get a result like below, please copy the URL generated by your ngrok program, here is mine https://8126-203-211-107-111.ngrok-free.app, we will use that later to configure GitLab Webhook.

Now, we’ll need to start the webhook_receiver.py script running on port 9001 so that it can handle requests sent from the GitLab Webhook.
cd /data/webhook_receiver
python webhook_receiver.py
Configure GitLab Webhook for monitoring merge request events
After you have a URL exposed on the server you’re running the webhook_receiver.py script, we’ll need to configure GitLab Webhook to send merge request events to this URL
Again, on Gitlab Console of your project -> select Settings on the left navigation column -> select Webhooks -> then, click Add new webhook

You’ll add the following contents to create configure Webhook:
- URL: https://8126-203-211-107-111.ngrok-free.app/webhooks
- Secret Token: Copy and paste the SECRET_KEY we’re using in our custom webhook_receiver script.
- Trigger: select Merge request events

Then select “Enable SSL verification” and hit “Add webhook” at the bottom to save configuration.

Done! The result you’ll get looks similar to:

You can test by clicking “Test” -> select “Merge request events” (Remember to create an MR on your project first prior to testing). In your terminal’s output when running webhook_receiver.py, you’ll get a successful message like

Ok, you’re done. Now we can test the workflow.
Testing the workflow
You can create your MR by yourself. I have created my MR already

We click “Approve” button, and we’ll see the pipeline is created on GitLab UI

In the terminal where you run python webhook_receiver.py, you’ll receive a successful message as below because webhook has sent an event that contains “approved” action. You can see the Payloads details by clicking Edit in your GitLab Webhook Settings above to view more details.

The output of the “test-code” job will show

Now, the pipeline has run successfully in the MR, we click Merge to merge the “test” branch into “main”. A new pipeline starts running onthe “main” branch

The result you’ll see in the pipeline on main branch shows

That’s all we need; you may have to modify the script further to achieve your own requirements. Additionally, this guide is simply about deploying the custom script on a local PC and running it manually. When it comes to the production environment, you may have to combine this script with a production WSGI server or something similar to deploy it in production. You can check out Deploying a Flask app with Gunicorn and Nginx on Ubuntu 20.04 to learn more about deploying a Flask app in production.
Share this:
Discover more from Turn DevOps Easier
Subscribe to get the latest posts sent to your email.