
Introduction
Once you developed your own Flask application, it’s better to deploy it onto a production environment. In this post, I’ll show you how to deploy the Flask app on a Ubuntu server that has Nginx and Gunicorn installed.
Requirements:
- A Ubuntu 20.04 server
- Gunicorn
- Nginx
- Python 3.8.10 and Pipenv
Step 1 – Install Python, Pipenv, and Nginx
The first step is to make sure our server has python 3.8 and pip installed
sudo apt update
sudo apt install python3-pip python3 python-is-python3
Now we need to install pipenv so that we can use it to set up a virtual environment
pip3 install pipenv
Checking pipenv version to make sure we installed it correctly
pipenv --version
Next, we proceed to install Nginx
sudo apt install nginx
Step 2 – Set up pienv a project directory for storing the Flask application
Create a project directory to store your project. I’ll create a /data/exampleproject directory
sudo mkdir -p /data/exampleproject
The default permissions when we create this project are set to root.
ls -ld /data/exampleproject/
Output:
drwxr-xr-x 2 root root 4096 Nov 4 10:54 /data/exampleproject/We’ll need to grant proper permissions to username binhdo (this user is created on my ubuntu) and group name www-data. User www-data is created automatically when you installed Nginx package in Step 1
sudo chown -R $USER:www-data /data/exampleproject/
Now go to the directory:
cd /data/exampleproject/
Create a .env file to store the environmental variables.
touch .env
Add the FLASK_APP and FLASK_ENV environmental variables to the .env file by editing the file with the command below:
nano .env
And add the following content:
# Add these two lines below:
FLASK_APP=wsgi.py
FLASK_ENV=production
Start the virtual environment. Pipenv will load variables in .env file automatically and create a virtual environment under this project.
$ pipenv shell
Loading .env environment variables...
Loading .env environment variables...
Creating a virtualenv for this project...
Pipfile: /data/exampleproject/Pipfile
Using default python from /usr/bin/python3 (3.8.10) to create virtualenv...
⠇ Creating virtual environment...created virtual environment CPython3.8.10.final.0-64 in 632ms
  creator CPython3Posix(dest=/home/binhdo/.local/share/virtualenvs/exampleproject-gLfDT35m, clear=False, no_vcs_ignore=False, global=False)
  seeder FromAppData(download=False, pip=bundle, setuptools=bundle, wheel=bundle, via=copy, app_data_dir=/home/binhdo/.local/share/virtualenv)
    added seed packages: pip==23.3.1, setuptools==68.2.2, wheel==0.41.2
  activators BashActivator,CShellActivator,FishActivator,NushellActivator,PowerShellActivator,PythonActivator

✔ Successfully created virtual environment!
Virtualenv location: /home/binhdo/.local/share/virtualenvs/exampleproject-gLfDT35m
Creating a Pipfile for this project...
Launching subshell in virtual environment...
binhdo@lab-pc:/data/exampleproject$
Step 3 – Set up the Flask application and Gunicorn
Install flask and gunicorn packages by using pipenv
pipenv install flask gunicorn
1 . Set up a demo Flask application
Now, we create a small Flask application. This application includes two files application.py and wsgi.py. The application.py file contains the main processes of the application. The wsgi.py is the file that we use to get the application running. In this example, I’ll create a small webhook receiver application to use the Flask API. You can check out this Build a Webhook Receiver part to explore a new topic.
Now, let’s create the application.py file:
nano application.py
Add the following content to it and save it:
from flask import Flask

app = Flask(__name__)


@app.route('/')
def index():
    '''Index page route'''

    return '<h1>Welcome to my webhook Receiver</h1>'

@app.route('/webhooks')
def handle_webhook():
    '''Webhooks page'''

    return '<h1>Handle webhook process</h1>'
Next, we create the wsgi.py file
nano wsgi.py
And continue adding the following content:
from application import app

if __name__ == '__main__':
    app.run(debug=False)
Now, you can test our Flask application. Let’s run flask run --host '0.0.0.0', specifying “0.0.0.0” for the application to listen on all network interfaces
flask run --host '0.0.0.0'
 * Tip: There are .env or .flaskenv files present. Do "pip install python-dotenv" to use them.
 * Serving Flask app 'wsgi.py'
 * Debug mode: off
WARNING: This is a development server. Do not use it in a production deployment. Use a production WSGI server instead.
 * Running on all addresses (0.0.0.0)
 * Running on http://127.0.0.1:5000
 * Running on http://192.168.86.35:5000
My server’s IP is 192.168.86.35. The Flask application starts with port 5000 by default. Make sure you’ve opened the firewall for port 5000 so that you won’t be blocked from accessing. Now you open your browser and try accessing http://192.168.86.35:5000/
You’ll see the application is loaded now in your browser

Press CTRL+C to stop the Flask development server.
2. Set up and Configure Gunicorn
In the above step, we were able to run the Flask application under development mode. Now, we can run this application by using Gunicorn to start the application running under production mode.
Run:
gunicorn --workers 4 --bind 0.0.0.0:5000 wsgi:app
Output
[2023-11-04 12:08:53 +1300] [5116] [INFO] Starting gunicorn 21.2.0
[2023-11-04 12:08:53 +1300] [5116] [INFO] Listening at: http://0.0.0.0:5000 (5116)
[2023-11-04 12:08:53 +1300] [5116] [INFO] Using worker: sync
[2023-11-04 12:08:53 +1300] [5118] [INFO] Booting worker with pid: 5118
[2023-11-04 12:08:53 +1300] [5119] [INFO] Booting worker with pid: 5119
[2023-11-04 12:08:53 +1300] [5120] [INFO] Booting worker with pid: 5120
[2023-11-04 12:08:53 +1300] [5121] [INFO] Booting worker with pid: 5121
Basic arguments:
--workers N: The number of core servers you want to set for handling requests. Adjust the number so that it suits with your total CPU resource on your server--bind 0.0.0.0:5000: make this application listen on all server’s interfaces on port 5000wsgi:app:wsgiis the file name ofwsgi.py.appis the instance of the Flask application
Press CTRL+C to stop the Gunicorn server.
If you don’t want to run this gunicorn with arguments manually. I would recommend that we use a gunicorn config file that stores arguments we want to add when we start Gunicorn server.
Let’s create a gunicorn.conf.py file still under /data/exampleproject/:
nano gunicorn.conf.py
And add these arguments below to the file:
bind = '0.0.0.0:5000'
workers = 4
timeout = 30 # 30 seconds
loglevel = 'info'
# you can speficy custom paths that you want to log your Gunicorn's log
errorlog = "-"
accesslog = "-"
access_log_format = '%(h)s %(l)s %(u)s %(t)s "%(r)s" %(s)s %(b)s "%(f)s" "%(a)s"'
Next, we’ll need to configure the systemd service file so that we can start Gunicorn server via systemd service. Before we do that, we should know where that gunicorn‘s path is as we are in the virtual environment. Run this command to get the path.
which gunicorn
Output:
/home/binhdo/.local/share/virtualenvs/exampleproject-gLfDT35m/bin/gunicornMy gunicorn is located in /home/binhdo/.local/share/virtualenvs/exampleproject-gLfDT35m/bin/gunicorn. Please take note of your gunicorn‘s path. We’ll use it in the next step.
Create a /etc/systemd/system/webhook_receiver.service file:
sudo nano /etc/systemd/system/webhook_receiver.service
Add the following content to the file:
[Unit]
Description=Gunicorn instance to serve Flask application
After=network.target
[Service]
User=binhdo
Group=www-data
WorkingDirectory=/data/exampleproject/
Environment="PATH=/home/binhdo/.local/share/virtualenvs/exampleproject-gLfDT35m/bin/"
ExecStart=/home/binhdo/.local/share/virtualenvs/exampleproject-gLfDT35m/bin/gunicorn -c gunicorn.conf.py wsgi:app
[Install]
WantedBy=multi-user.target
Next, We enable and start the webhook_receiver systemd service.
sudo systemctl start webhook_receiver.service
sudo systemctl enable webhook_receiver.service
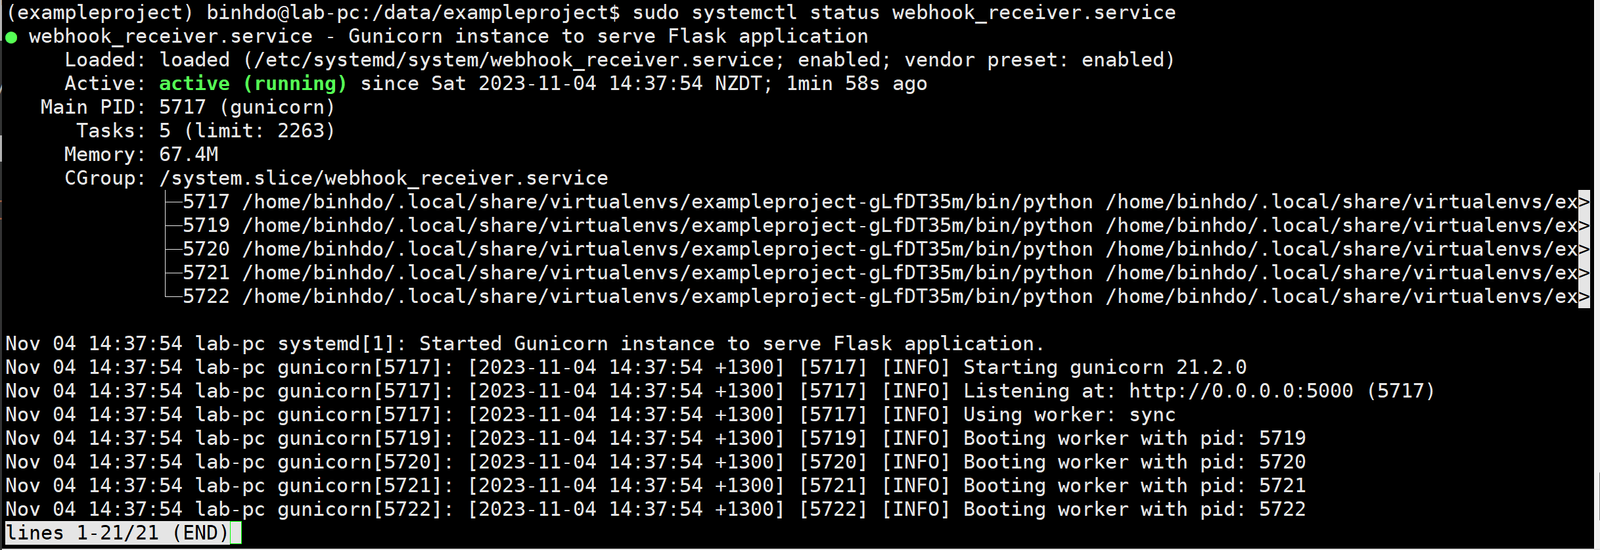
Check the service is started successfully
sudo systemctl status webhook_receiver.service

Step 4 – Configure Nginx
At the moment, when we want to access the Flask application, we still have to access via http://192.168.86.35:5000/. In this step, we’ll need to create and configure the server block in Nginx so that we can access the server through domains if we have one.
Create a webhook.conf file in /etc/nginx/site-available/
sudo nano /etc/nginx/site-available/webhook.conf
And add the content below to the file:
server {
    listen 80;
    server_name example-project.com www.example-project.com;

    access_log /var/log/nginx/example_project.com.access.log;
    error_log /var/log/nginx/example_project.com.error.log;

    location / {
        include proxy_params;
        proxy_pass http://localhost:5000;
    }

    location /webhooks {
        proxy_pass http://localhost:5000;
    }
}
In this example, I’m simply using normal HTTP, if you want to use SSL for more secured, you can add another server {} right below the content above. The example code is
server {
    listen 443 ssl http2;
    server_name example-project.com www.example-project.com;

    access_log /var/log/nginx/example_project.com-https.access.log;
    error_log /var/log/nginx/example_project.com-https.error.log;

    ssl_certificate     /path-to-your-certs/example-project.com.co.crt;
    ssl_certificate_key /path-to-your-certs/example-project.com.co.key;
    ssl_dhparam         /path-to-your-certs/dhparam.crt;

    location / {
        include proxy_params;
        proxy_pass http://localhost:5000;
    }

    location /webhooks {
        proxy_pass http://localhost:5000;
    }
}
The requirement for using SSL is that you have to have SSL certificates of your domains. You can either find SSL providers who issue SSL certificates with a fee or can refer to Let’s Encrypt to create your own SSL Certificates for free.
Now, we enable the website by creating a link to the /etc/nginx/site-enabled directory.
sudo ln -s /etc/nginx/sites-available/webhook.conf /etc/nginx/sites-enabled/webhook.conf
Check nginx configuration for errors:
sudo nginx -t
Output
nginx: the configuration file /etc/nginx/nginx.conf syntax is ok
nginx: configuration file /etc/nginx/nginx.conf test is successful
Restart nginx service to make the configuration take effect, and check status
sudo systemctl restart nginx
sudo systemctl status nginx
You’ll get the output as below
To use the domain example-project.com, you probably have to manually edit your hosts file on your local machine and point the IP of your nginx server to the domain example-project.com
For example, if you use Linux, run sudo nano /etc/hosts and add this line:
192.168.86.35 example-project.com
Press Ctrl + O and press Enter to save the content. Then press Ctrl + X to exit.
Note: if you want to have local DNS server so that you won’t have to manually edit in this way each time you test or can be reused in the future – please check out How to Set Up a Local DNS Server with Dnsmasq in Ubuntu 24.04 (Fast & Easy) to facilitate your testing.
Now, we open a browser and access the http://example-project.com/ and http://example-project.com/webhooks for testing.

Go to /webhooks page

Congratulations! Now your Flask app is successfully deployed with Gunicorn and Nginx
Conclusion
Now you have gone through a few steps of deploying the Flask application with Gunicorn and Nginx.
Share this:
Discover more from Turn DevOps Easier
Subscribe to get the latest posts sent to your email.